
How to fix the rails plasterboard – Make repairs or do other types of interesting DIY in our house is relatively easy. But very few people who actually know-how , especially when it comes to fixing rails plasterboard in an attic room. However, if you strictly follow each step of the recommendations below, you will manage to get there easily.
It is a good idea to be willing and wanting to learn how to fix rails plasterboard in an attic room. Now need to appeal to specialists , and even better, you can teach others what you have learned . Learn the techniques of fixing rails plasterboard requires prior specific and some specific tools and materials available .
Conditions previously required to fix plasterboard rails
To effectively carry out the work of fixing rails plasterboard requires a substrate preparation . Thus, one must necessarily remove dust from the wall, floor and ceiling then ensure that the place where the plates will be fixed is clean. Then using a cord , it must draw on the floor , the installation of the partition , and then projecting this route to walls and ceilings by using a ruler and a plumb line. In addition, it must have at its disposal the following materials: a measuring tape , laser or bubble level , a hacksaw , a stapler , a screwdriver , a knife , a putty knife , a brush or roller and a scaffold .
The introduction of rails plasterboard
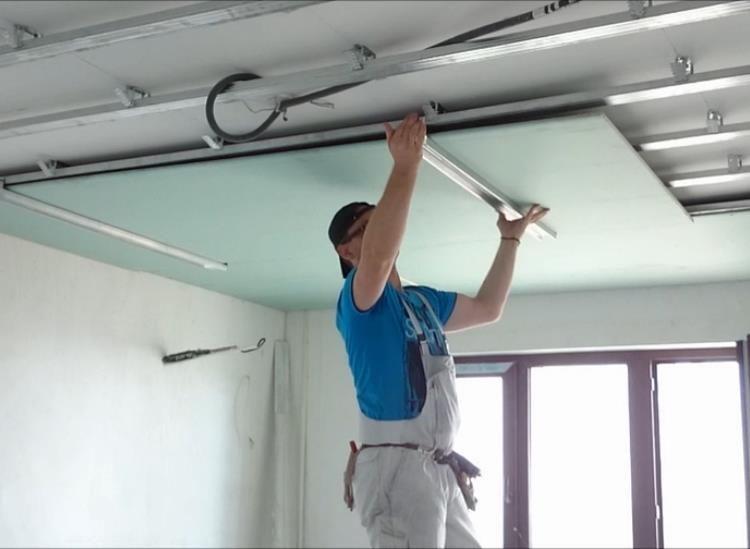
Above all, you should cut the metal bars, rails , as appropriate measures, while providing an opening for the door. Then , fasten the rails with screws about every 60 cm and thirdly, positioning a vertical rail way to screw the rail to the ceiling. After , place the door by inserting it directly into the rail. In fourth place , one must set a further horizontal rail so that one can be screwed into the first vertical rail . The fifth step is to place another vertical rail on those at the top and bottom. For all yours and be strong , you have to double the vertical rails with wood rafter. Once this work is completed , you can now fit between the rails of the upper and lower vertical parts. Before completing the implementation of rails , do not forget the protective covers electrical son . Thereafter, you can proceed to the next step : setting . When fixing rails has been completed, we can now think recessed drywall .
How to install drywall ?
After the introduction of the rails , it should normally follow the implementation of plasterboard . This requires before we took all necessary measures to cut the plasterboard. You must use the right tools and materials to cutting your plate. Now, onto the metal frame can attach drywall . However, it is important not to forget to put insulation between studs or vertical pieces . To fix the plates, cut plates that are fixed to the rails about every 25 cm, the screws are used , after making marks on the plate. It must be ensured that the plates are secured to the rails to consider your work to be perfect and fully completed . However, care must be taken to a bang so that the finish is flawless : the joints must be clean and sanded . A sub- layer of paint will be needed on the plates so that they are even more beautiful . Once the drying is done , you need layers of paint on the wall and ceiling for the home is bright and everything is in color harmony .
How to make a plasterboard wall in the toilet
How to make a plasterboard wall in the toilet – In ordinary apartments open sewer riser does not look very attractive. This deficiency is easily corrected by the wall of plasterboard. It does not take much time. The result is a very neat and comfortable room .
For this you will need: wood or metal profile , screws, water-resistant drywall, furniture and door handle .
How To Install A Geberit Wall-Hung Toilet Carrier With Flush Actuator Video
This is an exceptional video from Geberit that shows the proper installation of their concealed wall carrier to allow for a wall-hung
TOTO AP or EP Wall-Hung Toilet Installation Video
Installation video for the TOTO AP WASHLET+ Wall-hung toilet. With the optional Auto Flush.
Wall hung toilet installation Video
Wall hung toilet installation A few tricks and tips to make your bathroom installation a whole lot easier. See how to connect the ..

Be sure to use only water-resistant drywall . He usually paper blue or green color. This drywall impregnated with a special compound that protects against rot , mildew and moisture.
Seal off the pipe is not recommended. May need access to the taps . You need to figure out where to make the door . You can instead use plastic door shutters. They are lighter than the door .
If you are using blinds , you can wall mount on metal profile. But when installing door hinges need space for a block of wood to strengthen .
Draw a line with chalk on the ceiling and the floor, where they intend to mount the bar or profile. First, make a note on the ceiling , then the walls and floor , with a plumb . Additional rack , most likely you will not be useful , since the width of the wall does not exceed the width of a sheet of drywall. If, however , the wall was wider than the sheet, the need to strengthen the rail with the expectation that would be an edge plasterboard fell on the middle rack.
In order to use a hacksaw to cut the profile or tin snips . Screws are attached at intervals of not more than 40 cm in concrete or masonry wall, use dowels .
In accordance with the size of the wall cut drywall . Well suited for this hacksaw with fine teeth . Sheets are stacked without gaps that would rack profile is not visible. Screws need special that is suitable for plasterboard. Plasterboard wall can be painted with acrylic paint specialist or lay tile. Be sure to treat the surface with primer .
When a narrow wall, about half a meter , divide furniture . Or attach to the frame of the bars piece of drywall . Attached all the usual furniture hinges .
If the wall is wide, it is in the process of work, where will the hinges , attach the bar . Attach the handle on the door to open .
Bathroom setting ! Beautiful Bathroom Design & Control water leakage & Smell in pipes Video
Bathroom setting ! Beautiful Bathroom Design & Setting for Home, Office & Hotel #leakage #control Latest Beautiful Bathroom for ..
How To Install A Wall Mounted Toilet | This Old House Video
#ThisOldHouse #AskTOH SUBSCRIBE to This Old House Wall mounted toilets are becoming …
0:02 Wall-Hung toilets have become much more popular in this country on new bathroom installations for years we’ve seen them in …
Can I Install a Wall-Mounted Toilet in My Bathroom? Video
Needing more information on wall-mounted toilets? Check out our Wall-Mounted Toilet Buying Guide for more information! question is can I install a wall-mounted toilet in my bathroom there are many advantages to wall-mounted toilets they save …
Install a GROHE wall-hung toilet system Video
Follow this step by step installation guide to find out how to install your new wall-hung toilet system from GROHE easily.
Laying tiles on plasterboard installing ceramic tile on drywall
Laying tiles on plasterboard – Most often, tiling on plasterboard done in the kitchen, in the bathroom or the bathroom. And precisely in those places where temperature changes occur constantly . For such spaces is often used water-resistant gypsum plasterboard , which can not only quickly and accurately align the walls, but also to build the necessary structures that will be able to cover all protruding pipes indoors. To tile during operation did not start to fall off with drywall , all the work should be made strictly according to the rules .
How to Install Metal Stud Framing / Drywall video
We build a metal stud wall using a steel frame, plasterboard and insulation. This wall system is a brilliant way to construct an
How A Drywall Professional Uses Color To Get Walls Paint-Ready video
Thomas Johnson specializes in patching holes and finishing sheetrock to create a smooth surface for painting. Two coats of ..
How to Fix Holes in Drywall – 4 Easy Methods video
Fixing holes in drywall is easier than you might think. Follow along and don’t be intimidated! You got this! #drywallrepair …
In the first stage you have to make the first crate under the drywall, it should only be installed in a place where in the future you will produce a tile trim . Basis , you can make out of metal rails and bars. If the sheathing material for all of you have chosen a tree, then it should be treated with special impregnation for water resistance , it is recommended to perform the procedure at least two times .
Step into the crate should not reach more than twenty centimeters. This sequential fixation is necessary in order to drywall during operation will not be offended , because tile glue will have a heavy weight and otherwise, can be broken masonry .
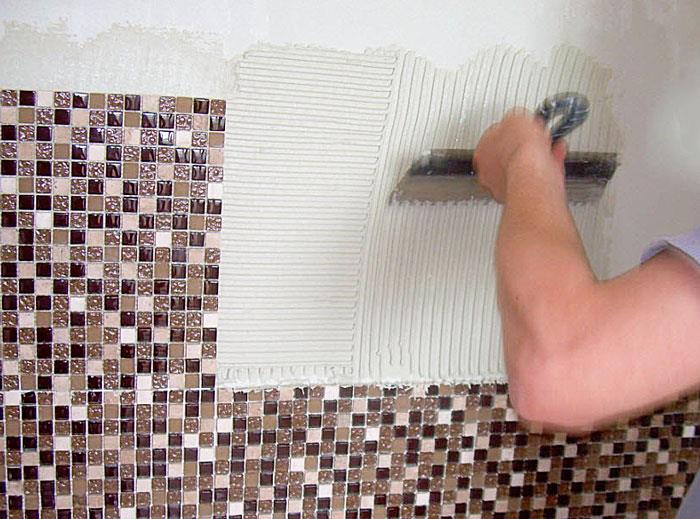
If the water-resistant primer you decide to choose the concentrate , then dilute it should be strictly provided by the manufacturer’s instructions . In order to make you more comfortable working roller , it is recommended to choose a plastic container with embossed frame. Such capacity , you can buy in any hardware store .
Drywall should always be primed with two coats while before applying the second coat let dry for a while first . Thus, you can get more stable grip tile adhesive with plasterboard .
Drywall Construction Crew Working Fast video
How to cut drywall and hang fast. This drywall construction crew is one of the most efficient in the business. Everyone knows what .
How To Install Drywall DIY Tutorial A to Z video
Follow my system and you will love doing drywall as much as I do. Step by step instruction so you can install and tape like a pro.
How to decor gypsum false ceiling designs | Gypsum decoration ceiling video
How to decor gypsum false ceiling designs Gypsum decoration ceiling Gypsum ceiling designs for hall, Gypsum ceiling simple
Cutting Fixing Taping Finishing Drywall Construction Tools by DrywallRioja video
Watch Pro Drywall Construction Worker @drywallrioja show how he fixes drywall, cuts drywall, tapes drywall, finishes drywall
Gypliner Wall Lining – Gyproc Drywall System video
Public Disclaimer – This Installation Video has been shot in Saint Gobain Gyproc Academy with complete safety precautions
How to make a plasterboard
How to make a plasterboard – Speaking of the panel overlap in our homes , there is drywall can be very useful . Sometimes the differences between the panels on the ceiling and the total area of all of its skewed reach large sizes , plasterboard same hides all sorts of cracks and distortions , making the entire ceiling surface flat and smooth. Just this ceiling is very convenient for finishing hardwood floors . Besides installing the ceiling frame takes not much time .
Using this material , we can do anything . This may be sibling ceiling or convex to drawings, it can have several levels. Add piquancy spotlights and diverse hidden or open lights . Each zone can have its ceiling glow color . About design plaster ceiling can talk endlessly.
Gypsum ceiling very practical , it can be used in any room , whether living room or bedroom . If you need to install it in the bathroom , then in such cases used waterproof sheets. The advantages include drywall and its environmental friendliness. Indicators are designed for maximum acidity human . This type of material is produced without addition of synthetic additives using a gypsum board reinforced by fiber .
In addition drywall has high sound insulation and fire resistance. And therefore, all who are not lucky with the neighbors, plasterboard ceilings just what you need .
If you decide that you need it plasterboard ceiling , before embarking on a major work should pay attention to the following nuances.
Drywall ceiling
To begin to determine the height of sinking , which will decrease plasterboard ceiling. For example, you plan to install spotlights the size of its height 5 cm, then at least have to leave about 6-8 cm from the ground floors. Thus, is calculated by omitting the vent line and various engineering highway or cases laying insulation and soundproofing.
Given the size of a single sheet of 2.5x 1.2 m and weighing 16-18 kg work better and more convenient to carry on business with a partner. Having decided to do their own installation , prepare the necessary power tools, such as punch and screwdriver , you will need to manually metal scissors , tape measure , hammer , knife , etc. You will also need some tools to Providence plastering work .

First you need to make a mark , where it will be located zero , and only then proceed to installation profiles. Not least the technical characteristics of the suspension system . Minimum load to be 14 kg per 1m2 .
Frame requires special attention , it must be installed so that it is firmly tied and was in an ideal level . Otherwise cracks may occur on the ceiling.
Then proceed to the main frame plasterboard paneling . After that all joints and seams are glued reinforcing tape , and closed up the special putty . This makes the ceiling tight. Applied on top of several layers of finish putty surface . After done the above installation work begins the final stage – painting , plastering or other decoration ceiling. Choice could fall on almost any decorative finishing material.
To plasterboard ceiling has been well established , it is necessary to properly carry out all the work on its installation . One such requirement is the correct pre- laying drywall sheets horizontally. Drywall prone processes of deformation , so do not put the sheets on edge , propping them up against the wall . Qualitatively made plasterboard ceiling fill your home with beauty and comfort and will delight you for years to come .
how to put up plasterboard ceiling at height
We’ll talk about how to make a ceiling in a small room with b yourself, about the merits of building material drywall. like any job, it requires some training. Must be done to ensure continuity of action. not always you will be able to break away and buy what you need. Download easy to follow how to instructions for installing gypsum walls and ceilings and cornice along with a DIY project. I have found such treatment a lot of fans. It is not in vain.
There are several advantages:
- These things popular now produces its plaster for long respected builders of fire resistance and the ability to absorb moisture.
- Do not contain any toxic substances, making the drywall material is environment-friendly.
- The above features can be added the fact that they retain heat well and has good sound insulation.
- This is why this material is ideal for use not only in public places but also in homes.
- Messages completely, allowing you to design the geometry of any complexity, even the dome.
- Light-weight and dimensions of the message can create a design for any small area. For example, ceiling gypsum board in a Gorge or columns and trim pipe connections.
How to sheathe the ceiling plasterboard
These works have been widely spread in the repair or restoration of older buildings. Is the arrangement of the surface of the ceiling allows not only to hide some imperfections, but also hide their existing communications, creating the perfectly flat front side. The material is harmless and safe from fires. The durability and the provision of any form of even some pros drywall. On how to sheathe the ceiling plasterboard properly and for a long time read below.
For installation you need to level, screwdriver, drill, cord, than, mouldings, dowels with screws and the material. First level in the room. First, do it by eye, and then take the same distance from this line. Levellers is used for this work, as this procedure you need to make accurate and clear to your ceiling doesn’t look like a wavy surface of the sea.
- how to put up plasterboard ceiling at height
- How to properly primed the ceiling before painting
- Drywall Tape And Top Coat Wall To Ceiling Angle
- Additional services for installation of suspended ceilings
- Making plasterboard – video
- plaster ceiling for painting
- How to make a plasterboard wall in the toilet
Fasten the profile in increments of 50 cm, and then doing the layout of our guides. They must be over 40 cm (the length of the drywall) with the expectation that the joints of the panels were made on the frame profile. Next is suspension from step 1, and then fasten the screws on her profile. Before sheathing plasterboard ceiling be sure to check the strength of the profile structure.
Fasten the letters to the rest of the building and made a profile with screws for metal (the length of them should be 25 mm). Step between the bindings is 15-20 cm, but deep into the screw you need to slightly drown it to PuTTY does not prevent future ceiling, but do not overdo it, because then it does not stick. This problem can be avoided by Foundation using special torque on the screwdriver.
Edges of sheets of drywall process plane to expand the seam for a better setting and drying of plaster (it we sealed joints). For priming, you must use a “deep Primer”, it provides and the reliability of the design, and a better grip the rest of the materials that you expect to put on drywall. Sealed joints in advance prepared a special mixture.
it in the seam, spare no effort, and then tailor tape. After the composition of the plaster, you can grab. After waiting 12-24 hours (before drying the mixture) grind the treated joints. Now you know how to sheathe the ceiling Sheetrock without much effort and expense on employees.
- Sheathe clapboard walls and ceiling
- Improving the reliability of metal doors
- do it yourself repair an old bathroom without extra costs
- stainless steel water heater connector
- How to remove old paint from the surface
- As drywall sheathing video
- Installation of drywall adhesive – video
In this article we will describe how to sheathe the plasterboard ceiling. Tools and necessary materials. the tools you will need, Sheathing plasterboard ceiling also refers to such works. Sheathing plasterboard not only walls, but the ceiling is not the only way, Before you decide to sheathe the ceiling plasterboard, make the markup. It is from this phase of the work will depend on the quality of the final result. On construction of the forums you can find many recommendations as to sheathe the ceiling plasterboard, how to do it correctly.
How to make a niche for bath plasterboard
How to make a niche for bath plasterboard video – If you want a beautiful and modern renovation in the bathroom, you should think not only about the wall covering tiles, but also on how close the sidewall beautiful bathroom itself . Later in th
Error: Contact form not found.
is niche can store various cleaners , etc.
In this video you will learn how to make a niche under the bath of plasterboard. Of course you can buy a plastic screen that is also easy to decorate for a bath, but , as a rule, these screens are not very durable. In the video you will see all the stages of work on manufacturing niches. Construction of frame , cutting sheets of drywall , plaster and fixation .
How to make a niche for bath plasterboard – video
How to fix the rails plasterboard
- calculating power and amount of heating cable floor systems
- how to make a garden path with gravel
- Repair your washing machine LG sensor
- Maintenance repairs and home improvements
- How to insulate Vinyl Windows
- American woman slapped policemen to quit smoking
- commercial truck loans
- 3600 series hp deskjet printer
- Hints and tips on caring for a computer monitor
- How to choose a ladder
